
- 后台批量导入word格式的题目
- 每日随机出题做题
- 定时随机生成试卷考试
- 考试成绩排名
- 错题库
- 做题排名
这是由于mysql字段的存储字符集存储不了,比如utf8中存储不了一些表情符号,比如微信上的昵称:abc🍃,解决办法就是存储要修改对应的编码字符集,与数据库的通讯链接也要修改对应的编码字符集
两者少一个都不行
gitlab-rake gitlab:backup:create
如果是putty远程连接服务器执行该命令,可能由于某些git库太大导致putty迟迟没有反应而导致链接中断,链接中断后该命令也会终止执行,所以可以通过nohup 来把命令脱离命令行执行:
nohup gitlab-rake gitlab:backup:create 2>&1 &
通过在nohup.out 中可以查看输出日志
备份成功后在/var/opt/gitlab/backups中会产生一个类似于1610804990_gitlab_backup.tar的文件,一定要确保backup完成在copy该文件,上面的nohup.out中最后几行是下面情况时,说明备份完成了:
done
Dumping uploads …
done
Creating backup archive: 1610804990_gitlab_backup.tar … done
Uploading backup archive to remote storage … skipped
Deleting tmp directories … rake aborted!
Don’t know how to build task ‘/var/opt/backlog.log’
(See full trace by running task with –trace)
done
Deleting old backups … skipping
gitlab-rake gitlab:backup:restore BACKUP=/var/opt/gitlab/backups/1610804990
注意backup中的文件名不是完整的1610804990_gitlab_backup.tar,而只是_gitlab_backup.tar的前面部分
可以用scp把备份文件上传到目标服务器,在目标服务器上执行:scp src_username@src_ip:/var/opt/gitlab/backups/1481529483_gitlab_backup.tar /var/opt/gitlab/backups
gitlab升级不能一次性跨大版本升级,比如不能6.x升级到13.x,只能在一个major版本升到最高级别后在升级到下一个major版本(版本号格式:major.minor),官方给出来的升级顺序是:
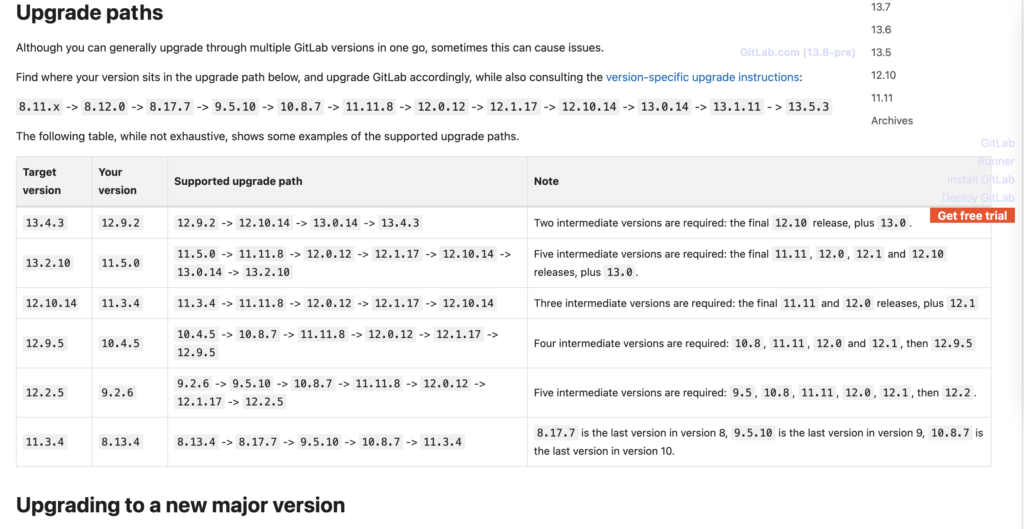
但我从7.6.x 升级到13.7并没有完全按照这个顺序,基本规则是升级到当前major版本的最后一个版本后,再升级到下一个major的第一个版本,一次类推直到最新版本
每个版本的镜像可以从这里下载:https://mirrors.tuna.tsinghua.edu.cn/gitlab-ce/yum/el7/
每次升级前,先stop服务
sudo gitlab-ctl stop unicorn
sudo gitlab-ctl stop sidekiq
sudo gitlab-ctl stop nginx
数据库不要stop,在安装时是需要备份数据库的,所以不能停
wget 下载好对应的rpm包后执行 rpm -Uvh 安装包
安装包会备份数据库部分,安装新版本,删除旧版本,升级成功收gitlab-ctl restart即可
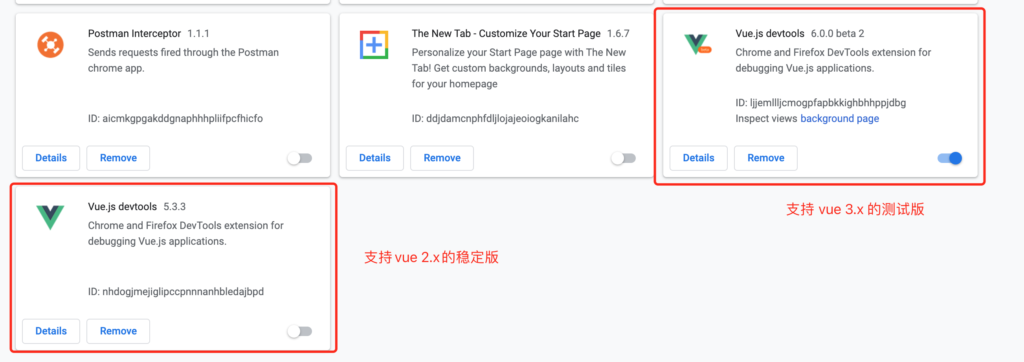
需要按照vue-devtools最新版本(6.x), 但这会和5.x的冲突,禁用掉5.x的版本,重启浏览器即可
https://v3.vuejs.org/guide/migration/introduction.html#devtools-extension

yum install -y httpd
systemctl start httpd.service
systemctl status httpd.service(查看运行状态)
systemclt enable httpd.service
至此apache安装完毕
yum -y install mod_ssl
curl -sS https://downloads.mariadb.com/MariaDB/mariadb_repo_setup | sudo bash
yum clean all
yum makecache
yum repolist
#这个可以看版本号
yum search mariadb –showduplicates
或
yum search mariadb
sudo yum install MariaDB-server galera-4 MariaDB-client MariaDB-shared MariaDB-backup MariaDB-common
systemctl enable mariadb –now
6.配置数据库
mysql_secure_installation
首先是设置密码,会提示先输入密码
Enter current password for root (enter for none):<–初次运行直接回车
设置密码
Set root password? [Y/n] <– 是否设置root用户密码,输入y并回车或直接回车
New password: <– 设置root用户的密码
Re-enter new password: <– 再输入一次你设置的密码
其他配置
Remove anonymous users? [Y/n] <– 是否删除匿名用户,回车
Disallow root login remotely? [Y/n] <–是否禁止root远程登录,回车,
Remove test database and access to it? [Y/n] <– 是否删除test数据库,回车
Reload privilege tables now? [Y/n] <– 是否重新加载权限表,回车
初始化MariaDB完成,接下来测试登录
mysql -uroot -ppassword
设置数据库允许远程连接:
mysql -uroot -p(进入数据库)
查看MySQL库中的user表(user表中存着链接信息)
select host,user from user;
使用更新语句是root用户可以在任意IP的电脑上登录
update user set host=’%’,user=’root’ limit 1;
使修改生效
flush privileges;
退出Mariadb后并重启 mariadb服务
systemctl restart mariadb
至此,数据库安装完毕
yum install epel-release
yum install http://rpms.remirepo.net/enterprise/remi-release-7.rpm
yum install yum-utils
yum install -y php73-php-fpm php73-php-cli php73-php-bcmath php73-php-gd php73-php-json php73-php-mbstring php73-php-mcrypt php73-php-mysqlnd php73-php-opcache php73-php-pdo php73-php-pecl-crypto php73-php-pecl-mcrypt php73-php-pecl-geoip php73-php-recode php73-php-snmp php73-php-soap php73-php-xmll
systemctl enable php73-php-fpm(开机自启动)
systemctl start php73-php-fpm(启动)
在/etc/httpd/conf.d文件夹新建一个conf配置文件,再把以下内容拷贝到里面
例如:
DocumentRoot “/var/www/html/web/app/public_html” #项目根目录
ServerName lottery.yidianhulian.com #绑定的域名
Options FollowSymLinks ExecCGI
AllowOverride All
Order allow,deny
Allow from all
Require all granted
DirectoryIndex index.php index.html error/index.html
ErrorDocument 400 /error/400.html
ErrorDocument 403 /error/403.html
ErrorDocument 404 /error/404.html
ErrorDocument 500 /error/500.html
ErrorDocument 501 /error/501.html
ErrorDocument 502 /error/502.html
ErrorDocument 503 /error/503.html
ErrorDocument 504 /error/504.html
ErrorDocument 505 /error/505.html
ErrorDocument 506 /error/506.html
ErrorDocument 507 /error/507.html
ErrorDocument 510 /error/510.html
1.使用域名可以申请免费的ssl证书,选择apache版本,证书一共有三个文件,例如:
2.在服务器中新建一个文件夹,把这三个文件拷贝到里面
3.配置https其实就是配置/etc/httpd/conf.d/ssl.conf文件,使用yum下载mod_ssl后会自动生成这个文件。对文件进行配置,例如:
#
# When we also provide SSL we have to listen to the
# the HTTPS port in addition.
#
Listen 443 https
##
## SSL Global Context
##
## All SSL configuration in this context applies both to
## the main server and all SSL-enabled virtual hosts.
##
# Pass Phrase Dialog:
# Configure the pass phrase gathering process.
# The filtering dialog program (`builtin’ is a internal
# terminal dialog) has to provide the pass phrase on stdout.
SSLPassPhraseDialog exec:/usr/libexec/httpd-ssl-pass-dialog
# Inter-Process Session Cache:
# Configure the SSL Session Cache: First the mechanism
# to use and second the expiring timeout (in seconds).
SSLSessionCache shmcb:/run/httpd/sslcache(512000)
SSLSessionCacheTimeout 300
# Pseudo Random Number Generator (PRNG):
# Configure one or more sources to seed the PRNG of the
# SSL library. The seed data should be of good random quality.
# WARNING! On some platforms /dev/random blocks if not enough entropy
# is available. This means you then cannot use the /dev/random device
# because it would lead to very long connection times (as long as
# it requires to make more entropy available). But usually those
# platforms additionally provide a /dev/urandom device which doesn’t
# block. So, if available, use this one instead. Read the mod_ssl User
# Manual for more details.
SSLRandomSeed startup file:/dev/urandom 256
SSLRandomSeed connect builtin
#SSLRandomSeed startup file:/dev/random 512
#SSLRandomSeed connect file:/dev/random 512
#SSLRandomSeed connect file:/dev/urandom 512
#
# Use “SSLCryptoDevice” to enable any supported hardware
# accelerators. Use “openssl engine -v” to list supported
# engine names. NOTE: If you enable an accelerator and the
# server does not start, consult the error logs and ensure
# your accelerator is functioning properly.
#
SSLCryptoDevice builtin
#SSLCryptoDevice ubsec
##
## SSL Virtual Host Context
##
#找到这个标签
# General setup for the virtual host, inherited from global configuration
ServerName lottery.yidianhulian.com #配置域名
DocumentRoot /var/www/html/web/app/public_html #配置项目根目录
#添加这个标签允许访问该项目
Options FollowSymLinks ExecCGI
AllowOverride All
Order allow,deny
Allow from all
Require all granted
DirectoryIndex index.php index.html error/index.html
# Use separate log files for the SSL virtual host; note that LogLevel
# is not inherited from httpd.conf.
ErrorLog logs/ssl_error_log
TransferLog logs/ssl_access_log
LogLevel warn
# SSL Engine Switch:
# Enable/Disable SSL for this virtual host.
SSLEngine on
# SSL Protocol support:
# List the enable protocol levels with which clients will be able to
# connect. Disable SSLv2 access by default:
SSLProtocol all -SSLv2 -SSLv3 # 添加SSL协议支持协议,去掉不安全的协议。
# SSL Cipher Suite:
# List the ciphers that the client is permitted to negotiate.
# See the mod_ssl documentation for a complete list.
SSLCipherSuite HIGH:!RC4:!MD5:!aNULL:!eNULL:!NULL:!DH:!EDH:!EXP:+MEDIUM # 修改加密套件。
# Speed-optimized SSL Cipher configuration:
# If speed is your main concern (on busy HTTPS servers e.g.),
# you might want to force clients to specific, performance
# optimized ciphers. In this case, prepend those ciphers
# to the SSLCipherSuite list, and enable SSLHonorCipherOrder.
# Caveat: by giving precedence to RC4-SHA and AES128-SHA
# (as in the example below), most connections will no longer
# have perfect forward secrecy – if the server’s key is
# compromised, captures of past or future traffic must be
# considered compromised, too.
#SSLCipherSuite RC4-SHA:AES128-SHA:HIGH:MEDIUM:!aNULL:!MD5
SSLHonorCipherOrder on
# Server Certificate:
# Point SSLCertificateFile at a PEM encoded certificate. If
# the certificate is encrypted, then you will be prompted for a
# pass phrase. Note that a kill -HUP will prompt again. A new
# certificate can be generated using the genkey(1) command.
#SSLCertificateFile /etc/pki/tls/certs/localhost.crt
SSLCertificateFile /etc/httpd/cert/4520877_lottery.yidianhulian.com_public.crt #证书所在目录。要一一对应,注意看文件名
# Server Private Key:
# If the key is not combined with the certificate, use this
# directive to point at the key file. Keep in mind that if
# you’ve both a RSA and a DSA private key you can configure
# both in parallel (to also allow the use of DSA ciphers, etc.)
SSLCertificateKeyFile /etc/httpd/cert/4520877_lottery.yidianhulian.com.key #证书所在目录。要一一对应,注意看文件名
# Server Certificate Chain:
# Point SSLCertificateChainFile at a file containing the
# concatenation of PEM encoded CA certificates which form the
# certificate chain for the server certificate. Alternatively
# the referenced file can be the same as SSLCertificateFile
# when the CA certificates are directly appended to the server
# certificate for convinience.
SSLCertificateChainFile /etc/httpd/cert/4520877_lottery.yidianhulian.com_chain.crt #证书所在目录。要一一对应,注意看文件名
# Certificate Authority (CA):
# Set the CA certificate verification path where to find CA
# certificates for client authentication or alternatively one
# huge file containing all of them (file must be PEM encoded)
#SSLCACertificateFile /etc/pki/tls/certs/ca-bundle.crt
# Client Authentication (Type):
# Client certificate verification type and depth. Types are
# none, optional, require and optional_no_ca. Depth is a
# number which specifies how deeply to verify the certificate
# issuer chain before deciding the certificate is not valid.
#SSLVerifyClient require
#SSLVerifyDepth 10
# Access Control:
# With SSLRequire you can do per-directory access control based
# on arbitrary complex boolean expressions containing server
# variable checks and other lookup directives. The syntax is a
# mixture between C and Perl. See the mod_ssl documentation
# for more details.
#
#SSLRequire ( %{SSL_CIPHER} !~ m/^(EXP|NULL)/ \
# and %{SSL_CLIENT_S_DN_O} eq “Snake Oil, Ltd.” \
# and %{SSL_CLIENT_S_DN_OU} in {“Staff”, “CA”, “Dev”} \
# and %{TIME_WDAY} >= 1 and %{TIME_WDAY} <= 5 \
# and %{TIME_HOUR} >= 8 and %{TIME_HOUR} <= 20 ) \
# or %{REMOTE_ADDR} =~ m/^192\.76\.162\.[0-9]+$/
#
# SSL Engine Options:
# Set various options for the SSL engine.
# o FakeBasicAuth:
# Translate the client X.509 into a Basic Authorisation. This means that
# the standard Auth/DBMAuth methods can be used for access control. The
# user name is the `one line’ version of the client’s X.509 certificate.
# Note that no password is obtained from the user. Every entry in the user
# file needs this password: `xxj31ZMTZzkVA’.
# o ExportCertData:
# This exports two additional environment variables: SSL_CLIENT_CERT and
# SSL_SERVER_CERT. These contain the PEM-encoded certificates of the
# server (always existing) and the client (only existing when client
# authentication is used). This can be used to import the certificates
# into CGI scripts.
# o StdEnvVars:
# This exports the standard SSL/TLS related `SSL_*’ environment variables.
# Per default this exportation is switched off for performance reasons,
# because the extraction step is an expensive operation and is usually
# useless for serving static content. So one usually enables the
# exportation for CGI and SSI requests only.
# o StrictRequire:
# This denies access when “SSLRequireSSL” or “SSLRequire” applied even
# under a “Satisfy any” situation, i.e. when it applies access is denied
# and no other module can change it.
# o OptRenegotiate:
# This enables optimized SSL connection renegotiation handling when SSL
# directives are used in per-directory context.
#SSLOptions +FakeBasicAuth +ExportCertData +StrictRequire
SSLOptions +StdEnvVars
SSLOptions +StdEnvVars
# SSL Protocol Adjustments:
# The safe and default but still SSL/TLS standard compliant shutdown
# approach is that mod_ssl sends the close notify alert but doesn’t wait for
# the close notify alert from client. When you need a different shutdown
# approach you can use one of the following variables:
# o ssl-unclean-shutdown:
# This forces an unclean shutdown when the connection is closed, i.e. no
# SSL close notify alert is send or allowed to received. This violates
# the SSL/TLS standard but is needed for some brain-dead browsers. Use
# this when you receive I/O errors because of the standard approach where
# mod_ssl sends the close notify alert.
# o ssl-accurate-shutdown:
# This forces an accurate shutdown when the connection is closed, i.e. a
# SSL close notify alert is send and mod_ssl waits for the close notify
# alert of the client. This is 100% SSL/TLS standard compliant, but in
# practice often causes hanging connections with brain-dead browsers. Use
# this only for browsers where you know that their SSL implementation
# works correctly.
# Notice: Most problems of broken clients are also related to the HTTP
# keep-alive facility, so you usually additionally want to disable
# keep-alive for those clients, too. Use variable “nokeepalive” for this.
# Similarly, one has to force some clients to use HTTP/1.0 to workaround
# their broken HTTP/1.1 implementation. Use variables “downgrade-1.0” and
# “force-response-1.0” for this.
BrowserMatch “MSIE [2-5]” \
nokeepalive ssl-unclean-shutdown \
downgrade-1.0 force-response-1.0
# Per-Server Logging:
# The home of a custom SSL log file. Use this when you want a
# compact non-error SSL logfile on a virtual host basis.
CustomLog logs/ssl_request_log \
“%t %h %{SSL_PROTOCOL}x %{SSL_CIPHER}x \”%r\” %b”


公司总经理黎波在羊艾监狱进行了 “双控体系”的实际应用和操作,从风险点的录入、点检与提交隐患、处理隐患的流程、隐患的复查进行了深入浅出的讲解;会后与参会人员进行了交流,对操作中的难点和不解之处进行了业务指导。
http://jyglj.guizhou.gov.cn/ya/gzdt/gzdt_76184/202010/t20201022_64440261.html
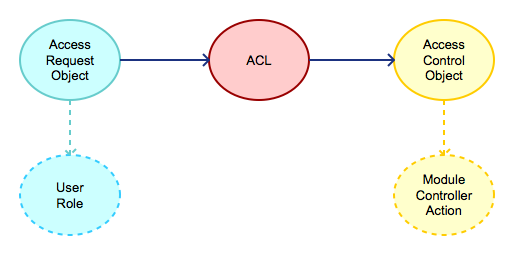
权限控制顾名思义就是控制什么“人”能(不能)访问什么(“操作”)。在身份认证中,我们已经知道了人是谁,现在这里就介绍yangzie如何控制这些人能做什么,yangzie是基于ACL来实现授权功能的,那么这里需要先阐明几个概念:

ACO访问控制对象,也就是ARO要请求访问的对象,在yangzie中也就是M/C/A(见yangzie基本原则),每个具体的ACO也有一个标识,就按照M/C/A的格式进行标识,比如order模块下面的增加订单add,假如他都组织在index控制器下(index_controller),action为add;那么该ACO的标识就是:/order/index/add;
根据具体的业务要求,ACO可以定义到某个具体的Action级别,或者Controller级别或者整个module级别
ARO访问请求对象,也就是要请求ACO的对象,通常他指“人”,各种各样的类型的人,每种“类型”有一个唯一的标识,用于区别一类人,比如某种角色的,也可以唯一标识一个人;
这个标识yangzie的设计是从大类/小类/具体某个用户id然后以/进行分割,举个例子,假如系统中存在这这几种角色,超级管理员,普通管理员,销售;可能这几种角色的ARO标识看起来是这个样子:
为什么要这样设计,是因为在进行授权时可以把权限分配给组或者具体某个类型或者具体某个人;然后具体的某个用户,如上面的管理员A,在验证权限时,再从具体id到大类来逐一验证,直到找到具体的权限是允许还是拒绝为止。
ARO和ACO分别定义了“操作”和“人”,那么剩下的就是把这两个关联起来,从而达到什么人能访问什么的目的;这个关联的地方就是AccessControlList;在yangzie中它是一个配置文件,位于app/__aros_acos__.php;默认的内容如下:
function yze_get_aco_desc($aconame) {
    foreach ( ( array ) yze_get_acos_aros () as $aco => $desc ) {
        if (preg_match ( "{^" . $aco . "}", $aconame )) {
            return @$desc ['desc'];
        }
    }
    return '';
}
function yze_get_ignore_acos() {
    return array();
}
function yze_get_acos_aros() {
    $array = array (
            "/" => array (//module/controller/action
                    "deny" => "",
                    "allow" => array (
                            "*" //aro
                    ),
                    "desc" => ""//功能说明
            )
		);

	return $array;
}
该文件主要包含3个函数:
ACL是一个数组,格式如下:
array (
            "ACO1 name" => array (
                    "deny" => "",//拒绝的ARO
                    "allow" => array (
                            "*" //允许的ARO
                    ),
                    "desc" => ""//ACO功能说明
            ),
            "ACO2 name" => array (
                    "deny" => "",//拒绝的ARO
                    "allow" => "*", //允许的ARO,
                    "desc" => ""//ACO功能说明
            ),
);
ACO name是ACO的标识,根据权限控制的级别可以具体定义到Action级别,或者只定义到Module级别;
deny定义黑名单,拒绝里面列出的ARO的访问;allow定义白名单,允许里面列出的ARO
ACL定义规则
一个真实的例子:
function yze_get_ignore_acos() {
    return array(
            "/card/front",
            "/package/package/grab",
            "/package/package/grabfail",
            "/package/front",
            "/zb/middlepage/view",
            "/wxbbs/front",
            "/zbad/front",
    );
}
function yze_get_acos_aros() {
    $array = array (
            "/admin" => array (
                    "deny" => "*",
                    "allow" => array (
                            "/admin"
                    ),
                    "desc" => "后端管理"
            ),
            "/sp/consumers" => array (
                    "deny" => "*",
                    "allow" => array (
                            "/sp"
                    ),
                    "desc" => "粉丝管理"
            )
    );
    if (YDWXP_TYPE == YDWXP_TYPE_MARKET || YDWXP_TYPE == YDWXP_TYPE_ALL) {
        $array ['/card'] = array (
                "deny" => "*",
                "allow" => array ("/sp"),
                "desc" => "卡券管理"
        );
        $array ['/card/card/*consume'] = array (
                "deny" => "*",
                "allow" => array ("/sp"),
                "desc" => "卡券核销"
        );
        $array ['/card/merchants'] = array (
                "deny" => "*",
                "allow" => array ("/sp/super","/sp/common"),
                "desc" => "商户管理"
        );
    }

	return $array;
}
ACO是根据M/C/A来定义的,这很明确和具体,但ARO标识怎么根据用户来定义?这也是通过hook来实现的,在app/hooks/auth.php中已经定义注册了该hook,开发者只需要实现即可,这里有一个真实的例子:
YZE_Hook::add_hook ( YZE_FILTER_GET_USER_ARO_NAME, function  ( $data ) {
	if ( !@$_SESSION [ 'admin' ] )return "/";
	if(is_a($_SESSION['admin'], "\\app\\sp\\Consumer_Model")){
	   return "/consumer";
	}
    if($_SESSION [ 'admin' ]->sp_id) {
       //是否子商户
       if ( ! isset($_SESSION [ 'is_sub_merchant' ]) ) {
           $_SESSION [ 'is_sub_merchant' ] = YZE_Hook::do_hook(YDMARKET_IS_SUB_MERCHANT, $_SESSION [ 'admin' ]->sp_id);
       }
       if ($_SESSION [ 'is_sub_merchant' ]) {
           return "/".$_SESSION [ 'admin' ]->user->type."/sub/".$_SESSION [ 'admin' ]->type;
       }
    }
	return "/".$_SESSION [ 'admin' ]->user->type."/".$_SESSION [ 'admin' ]->type;
} );
根据自己的业务系统的用户类型,自行设计自己的ARO标识接口。
ACL列表属于事先硬编码的控制列表,但在实际的业务环节中很多权限都是需要动态分配的,比如给某中角色设置权限,给具体某个人设置权限;这在yangzie中如何做呢?
yangzie有两个预留函数get_permissions($aroname),get_user_permissions();
这两个函数由开发者实现,分别返回指定aroname的acl或者返回某个具体用户的acl,这通常是具体的业务要求决定的,返回的仍然是acl数组结构。这两个函数放在任意的自动包含文件中(见__config__.php说明),但要注意
这两个函数必须属于顶级命名空间
当有这两个函数的实现时,他们的返回结果将覆盖ACL里面的控制
当配置好ACL后,如果一个用户访问被deny的内容,如某个action,某个controller或者某个module;yangzie将会抛出YZE_Permission_Deny_Exception异常,开发者可以通过hook YZE_FILTER_YZE_EXCEPTION来监听然后做响应的处理,默认情况下将显示500页面;
这就是说yangzie会根据ACL来验证用户的权限,如果用户没有权限就会立即抛出异常,这在进入开发者的业务逻辑之前就已经处理,开发者无需在自己的功能代码中去验证当前用户是谁,是否有权限方法;开发者就只关注自己的业务逻辑即可。
yangzie的Action包含两种情况,get方式和post方法,比如一个增加用户的例子,假如M/C/A是:users/index/add;那么他对应的post action就是users/index/post_add,会多一个post前缀,如果在ACL需要针对这两种情况单独控制,比如允许get但不允许post,也就是允许看,但不允许提交,那在ACL中需要分配针对两个action(add,post_add)进行处理
在实际的业务系统中,通常需要根据权限来控制输出的响应中某些部分用户可见,某些部分用户不可见,那么这可以通过两种方式来实现。
方法一:通过YZE_ACL::get_instance()->check_byname($aroname, $aconame)来判断并输出
if(YZE_ACL::get_instance()->check_byname($aroname, $aconame)){

// your output html

}
方法二:通过YZE_ACL::get_instance()->begin_check_permission($id, $aroname, $aconame)….YZE_ACL::get_instance()->end_check_permission($id, $aroname, $aconame)来输出
YZE_ACL::get_instance()->begin_check_permission($id, $aroname, $aconame)

// your output html

YZE_ACL::get_instance()->end_check_permission($id, $aroname, $aconame)
根据你的习惯来选择,如果你不喜欢跨度很大的if(){},那用第二种方式是个好选择