分类目录归档:技术分享
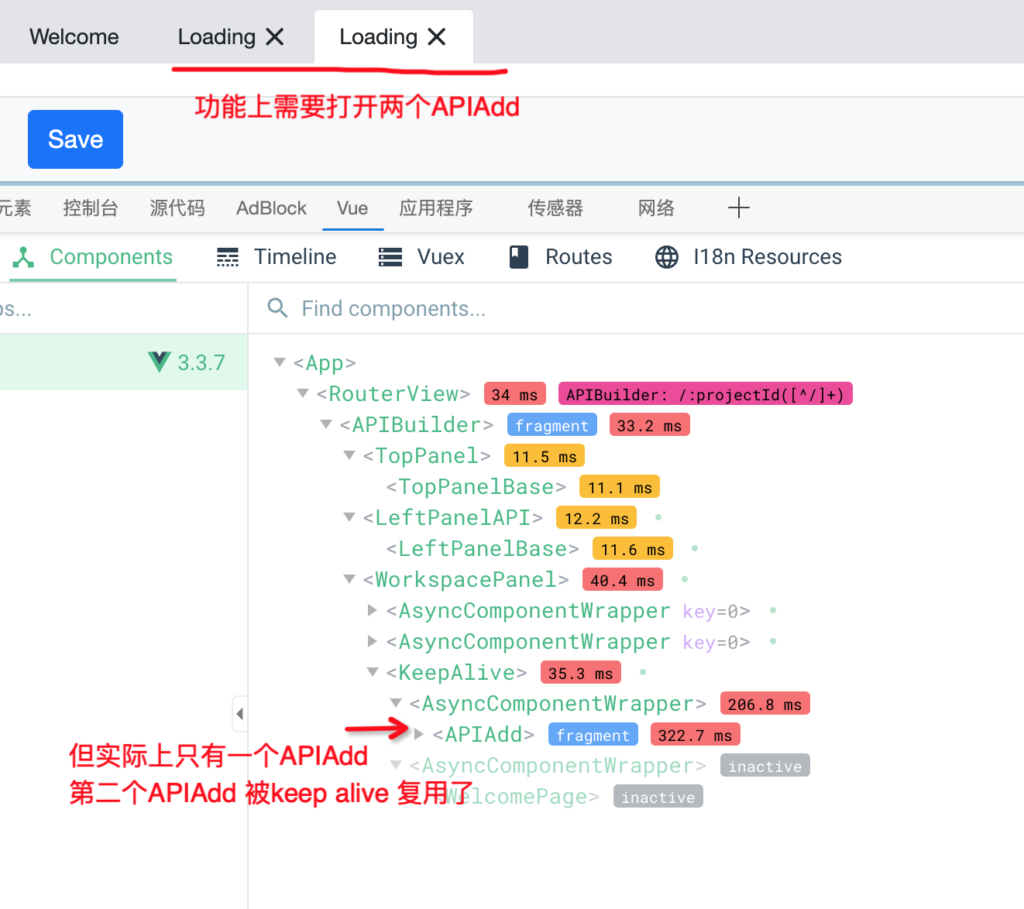
Keep-Alive中通过component多次加载同样的动态组件无法保持状态的解决办法
cygwin环境下 PHP Fatal error: Timezone database is corrupt – this should *never* happen! 解决办法
Windows安装cygwin + swoole,并配置crontab定时任务
macOS monterey 升级后安装php
macOS monterey已经完全移出了php,不再默认包含;升级后需要自行安装:
可以通过brew install 的方式安装php,但是通过该方法安装的php又无法和默认的apache配合使用,会包签名错误: No code signing authority for module at /opt/homebrew/Cellar/php/8.0.12/lib/httpd/modules/libphp.so specified in LoadModule directive.
当然可以采取对so代码自签名的方式,但实际上这不是最好的办法,因为brew install 安装的php和mac默认自带的apache之间会由于各种依赖库的问题无法跑起来
最好的办法就是停用默认的apache,然后apache和http完完全全都采用brew 来安装brew 会把依赖的各种包自行安装好
- sudo launchctl unload -w /System/Library/LaunchDaemons/org.apache.httpd.plist
- brew install php
- brew install httpd
注意brew 安装后的提示,相应的环境变量PATH都按安装后的提示设置,最好brew services start 对应的服务即可
gitlab 升级步骤
小版本升级,比如12.3.xx 升级到12.4.xx, 但是注意提示,如果升级不了会提示的:
gitlab preinstall: It seems you are upgrading from major version 13 to major version 14.
gitlab preinstall: It is required to upgrade to the latest 13.12.x version first before proceeding.
gitlab preinstall: Please follow the upgrade documentation at https://docs.gitlab.com/ee/update/index.html#upgrade-paths
- 下载rpm包,可以从这里下载https://mirrors.tuna.tsinghua.edu.cn/gitlab-ce/yum/el7/ 根据自己的系统选择对应的版本
- gitlab-ctl stop unicorn
- gitlab-ctl stop sidekiq
- gitlab-ctl stop nginx
- rpm -Uvh gitlab-ce-10.8.7-ce.0.el7.x86_64.rpm
- gitlab-ctl restart
- 查看升级后的版本号 cat /opt/gitlab/embedded/service/gitlab-rails/VERSION
慎用json_decode的assoc参数
我们在工作中遇到的情况:
- vue 3前端界面 + php 后端 API
- vue 3采用typescript
- API数据采用json格式
出现的问题
当post api时提交的json数据中包含{}这种空JSON对象,比如style:{}, 后端php在处理过程中会变成[]并返回给前端,导致前端后续的功能出现bug,如这时再往style中设置值就不能正常工作了:style[‘foo’] = ‘bar’, 这时设置是不成功
问题的原因
原因1: typescript的强类型,如果是javascript,这点其实并不影响,JS数组可以直接设置值:var style = []; style[“foo”] = “bar”;这个操作是成功的。
原因2: 后端php在处理的过程中都是按数组格式处理:json_decode($data, true),无形中就把{}变成了php的空数组,然后返回给前端时json_encode就变成[]。
解决办法
修改后端json_decode总是按对象格式处理
Mac 11.0以上版本不能编译PHP的问题
在Mac 11.x版本编译php会提示php.h不存在,phpize也看不出php版本内容:
grep: /usr/include/php/main/php.h: No such file or directory
grep: /usr/include/php/Zend/zend_modules.h: No such file or directory
grep: /usr/include/php/Zend/zend_extensions.h: No such file or directory
Configuring for:
PHP Api Version:
Zend Module Api No:
Zend Extension Api No:
这是因为新版本的mac 不在支持php了,后续可能会移除php, 通过php -v 可以看出

但实际上还没有完全移除PHP,可以查看/Library/Developer/CommandLineTools/SDKs目录下你系统版本对应的目录中usr/include/php里面的内容是否还存在,如果还存在说明php devl的头文件还在哪里,只是usr/bin/phpize找不到他们。

通过phpize的输出也不难看出,他是去usr/include/php里面找对应的头文件,那么我们建立软链接到对应的/Library/Developer/CommandLineTools/SDKs下面的php目录即可。但由于/usr/include目录是Read only的,不允许创建软链接,解决办法就是:
1. 把/usr/bin/phpize 和/usr/bin/php-config两个文件复制到/usr/local/bin,并修改如下两处内容,加上local

php-config中extension_dir也重新指定一个目录,并且把/etc/php.ini extension_dir中也同步调整:

2. 建立软连接 ln -s /Library/Developer/CommandLineTools/SDKs/MacOSX11.1.sdk/usr/include/php /usr/local/include/php
然后使用phpize时指定全路径 /usr/local/bin/phpize
configure时指定我们修改后的php-config:/usr/local/bin/phpize ./configrue –with-php-config=/usr/local/bin/php-config
make, make install 最后把编译的so文件会拷贝到指定的extension_dir目录中
该问题解决后,可通过pear的方式来安装其他pecl 扩展了
1. 下载pear: https://pear.php.net/go-pear.phar
2. 安装: php go-pear.phar,在出现的页面中分别把1,4两步设置为如下图所示,这其实是让pecl命令在bin目录中
3. 然后就可以通过pecl按照扩展了,比如pecl install zip,会下载源码并编译,同上面的phpize & configure & make & make install


Mysql incorrect string value
这是由于mysql字段的存储字符集存储不了,比如utf8中存储不了一些表情符号,比如微信上的昵称:abc🍃,解决办法就是存储要修改对应的编码字符集,与数据库的通讯链接也要修改对应的编码字符集
- 把对应字段的字符集修改成utf8mb4
- 同时把代码中数据库链接驱动中的字符集也修改成utf8mb4,比如用pdo需要设置 :SET NAMES utf8mb4
两者少一个都不行
gitlab 备份、升级与迁移
备份
gitlab-rake gitlab:backup:create
如果是putty远程连接服务器执行该命令,可能由于某些git库太大导致putty迟迟没有反应而导致链接中断,链接中断后该命令也会终止执行,所以可以通过nohup 来把命令脱离命令行执行:
nohup gitlab-rake gitlab:backup:create 2>&1 &
通过在nohup.out 中可以查看输出日志
备份成功后在/var/opt/gitlab/backups中会产生一个类似于1610804990_gitlab_backup.tar的文件,一定要确保backup完成在copy该文件,上面的nohup.out中最后几行是下面情况时,说明备份完成了:
done
Dumping uploads …
done
Creating backup archive: 1610804990_gitlab_backup.tar … done
Uploading backup archive to remote storage … skipped
Deleting tmp directories … rake aborted!
Don’t know how to build task ‘/var/opt/backlog.log’
(See full trace by running task with –trace)
done
Deleting old backups … skipping
恢复
gitlab-rake gitlab:backup:restore BACKUP=/var/opt/gitlab/backups/1610804990
注意backup中的文件名不是完整的1610804990_gitlab_backup.tar,而只是_gitlab_backup.tar的前面部分
迁移
可以用scp把备份文件上传到目标服务器,在目标服务器上执行:scp src_username@src_ip:/var/opt/gitlab/backups/1481529483_gitlab_backup.tar /var/opt/gitlab/backups
升级
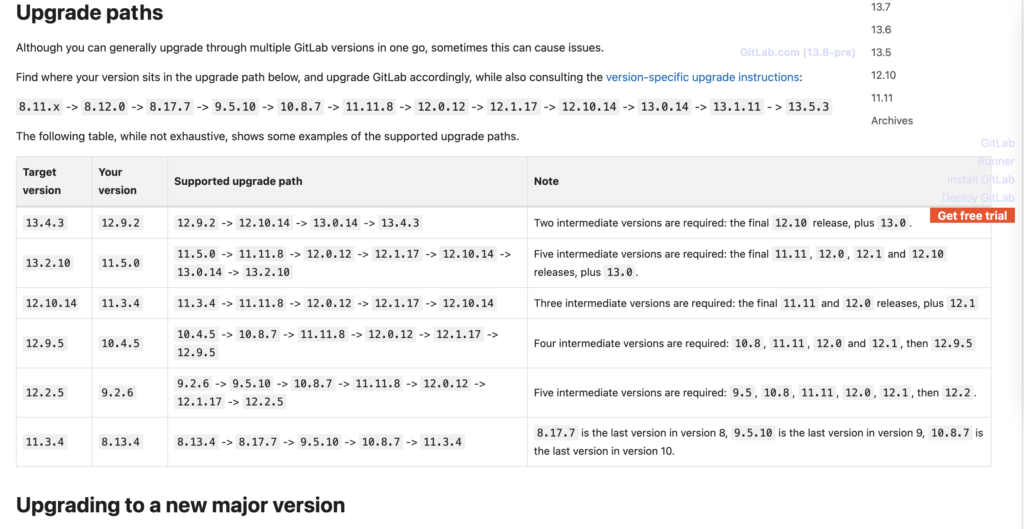
gitlab升级不能一次性跨大版本升级,比如不能6.x升级到13.x,只能在一个major版本升到最高级别后在升级到下一个major版本(版本号格式:major.minor),官方给出来的升级顺序是:

但我从7.6.x 升级到13.7并没有完全按照这个顺序,基本规则是升级到当前major版本的最后一个版本后,再升级到下一个major的第一个版本,一次类推直到最新版本
每个版本的镜像可以从这里下载:https://mirrors.tuna.tsinghua.edu.cn/gitlab-ce/yum/el7/
每次升级前,先stop服务
sudo gitlab-ctl stop unicorn
sudo gitlab-ctl stop sidekiq
sudo gitlab-ctl stop nginx
数据库不要stop,在安装时是需要备份数据库的,所以不能停
wget 下载好对应的rpm包后执行 rpm -Uvh 安装包
安装包会备份数据库部分,安装新版本,删除旧版本,升级成功收gitlab-ctl restart即可


